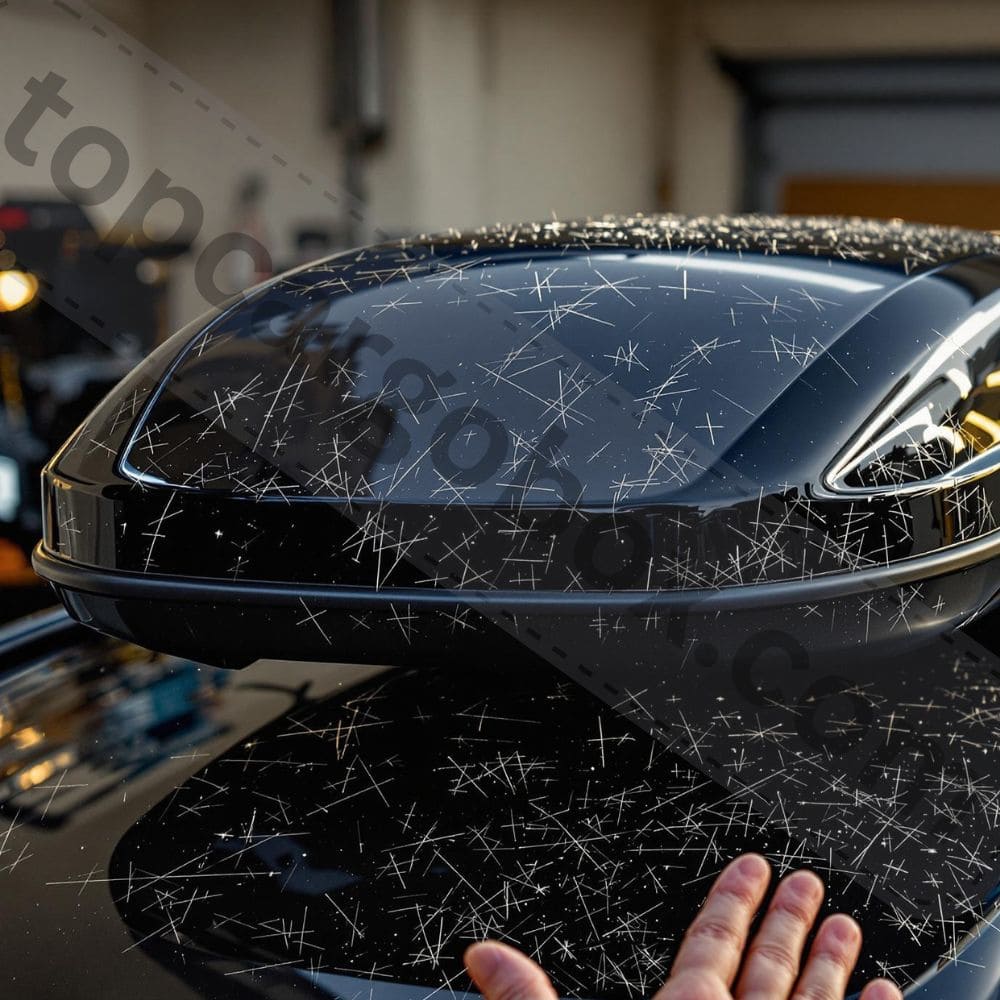
You snagged that awesome roof box, packed it full for an unforgettable trip, and rolled home feeling victorious… only to discover it looks like it went ten rounds with a gravel truck on the freeway? Totally sucks, doesn’t it? Seeing those deep gashes, the spiderweb of fine scratches, and random scuffs marring your once-slick gear carrier is a real gut punch. It’s enough to make you grunt out loud, right? You dropped some hard-earned cash on this thing expecting it to last, and now it seems prematurely aged and beat up. I get it, for real – that disappointment is legit. But hold up, before you decide those battle wounds are permanent or start pricing out a whole new box, chill. Believe it or not, banishing those scratches from your rooftop hauler is totally doable, and I’m pumped to guide you through the whole process, whether it’s a tiny blemish or a serious “oh wow” gouge.
How crushing is that? One minute you’re stoked about your travels, the next you’re staring at damage that makes your prized box look second-hand before its time. It feels unfair, especially after carefully choosing the right one (maybe you even checked our guide on how to choose a car roof box!). Those scrapes aren’t just cosmetic; they feel like a dent in your adventure pride. Nice try, rough road, but you won’t win this one! Don’t sweat it thinking you’re stuck with the eyesore or facing a huge replacement bill. Seriously, fixing this is within your reach, and I’m here to break it down step-by-step, no fancy jargon, just clear fixes for every level of scratch, from minor annoyances to the truly grunt-worthy ones. Let’s restore that showroom look so you can hit the highway feeling confident, not cringing at your roof.
Why Roof Boxes Get Scratched So Easily
Why does your roof box look like it got sandblasted after a single trip? Give me a break, you didn’t go out of your way to wreck it! Honestly, these gear haulers have it rough. Picture this: they’re stuck up top, taking every single hit Mother Nature decides to dish out. We’re talking pelting hail, gritty sand, sharp gravel flying off semis, and low branches whacking it if you explore any back roads. It’s like a non-stop assault course up there! How annoying is that? You’re just trying to get your stuff from A to B. And that’s before you even start wrestling gear in and out. Remember that time your ski edge clipped the lip? Or how about that heavy cooler that scraped the side when you were loading up in a rush? How many times has a backpack zipper or a bike pedal accidentally bumped it? Those little knocks seem tiny, but trust me, they totally add up over seasons of adventures.
But wait, there’s more! It’s not just the outside world or clumsy moments (we’ve all been there!). The plastic itself – usually tough stuff like ABS or polycarbonate so it doesn’t crack on impact – isn’t magically scratch-proof. Off the top of my head, gritty dirt is its kryptonite. Think about all that fine road dust sticking to it. Then, maybe you grabbed that old school kitchen scrubber or some harsh cleaner to wash off the grime after a muddy trip? Nice try, but those can actually create tons of fine, swirling scratches over time, making the whole surface look dull and worn. For real? Yeah, sometimes trying to clean it makes it look worse! It is what it is, but hey, knowing exactly why your box looks battle-scarred is the first big step to fighting back effectively and keeping it looking sharp. Understanding the enemies – road junk, loading bumps, the plastic’s limits, and even well-meaning cleaning mistakes – gives you the power to protect it better next time. Maybe it’s time to rethink your wash routine? Our guide on how to carwash with a car roof box has the gentle cleaning lowdown.
Assessing the Damage: What Kind of Scratch Are We Dealing With?
Before you grab the first tube of toothpaste you see (yes, that’s a real hack, we’ll get there!), you gotta play detective. Not all scratches are created equal, and treating them wrong can make things worse. No way should you use heavy sandpaper on a tiny surface mark! So, how’s it going with your inspection?
- Run Your Fingernail Test: This is old school but legit. Gently drag your fingernail across the scratch, not along it. Does your nail catch in the groove? If it drops right in, you’re likely dealing with a deeper scratch. If it just glides over feeling a slight ridge, it’s probably more superficial. Pretty good indicator, right?
- Check the Visibility: Stand back and look at the scratch under different light. Bright sunlight is brutally honest! Can you see a distinct groove, or is it more like a cloudy haze? Deep scratches often look white or lighter because they’ve penetrated the top layer, while surface scratches might just look dull. That’s crazy how much light reveals!
- Feel the Texture: Gently run your fingertip over it. Is it rough and jagged, or smooth but visually noticeable? Roughness often means it’s deeper or there might be embedded grit. Exactly what you need to know before choosing your weapon.
Quick Reference: Roof Cargo Box Scratch Types
Scratch Severity | Fingernail Test | Visual Appearance | Repair Difficulty | Best Repair Methods |
|---|---|---|---|---|
Surface Scratches (Clear Coat/UV Layer) | Nail glides over, may feel slight ridge | Cloudy haze, dullness, fine lines, often only visible in direct light | ★☆☆☆☆ (Easy) | Plastic polish, toothpaste hack, spray wax |
Light Scratches (Into Color Layer) | Nail catches slightly | Visible line, color might appear lighter, no deep groove | ★★☆☆☆ (Moderate) | Plastic polish kits, rubbing compound (gentle), scratch remover pens |
Deep Scratches/Gouges (Through Color Layer) | Nail catches significantly | Obvious groove, often white/light colored, feels rough | ★★★☆☆ (Difficult/Advanced) | Plastic filler + sanding + painting, wet sanding + polishing |
Scuffs | Nail may glide or catch minimally | Surface marks, discoloration, often from abrasion | ★☆☆☆☆ (Easy) | Magic eraser (carefully!), plastic cleaner, isopropyl alcohol |
Your Scratch Repair Arsenal: Tools & Materials You Might Need
Alright, so you’ve played detective and know your enemy. What’s new in your toolbox? Don’t worry, you won’t need a mechanic’s garage. Most fixes use stuff you might already have or can grab easily. Totally depends on the scratch depth:
- For Surface Stuff: Microfiber cloths (lots!), mild car wash soap, water, plastic polish (Meguiar’s PlastX is popular), maybe even white toothpaste (non-gel, non-whitening!), automotive spray wax. Old school, but sometimes simple works.
- For Light Scratches: Dedicated plastic scratch remover kits (like those from 3M or Turtle Wax), rubbing compound (use VERY sparingly!), finer grit sandpaper (2000-3000+), more microfiber cloths, masking tape. Sounds good, right?
- For Deep Scratches/Gouges: Plastic repair filler (bondo for plastic), applicator sticks, wet/dry sandpaper (progressing from ~800 grit to 3000+), plastic primer, color-matched spray paint (CRUCIAL!), clear coat spray paint, masking tape and paper, polishing compound, buffer (optional but helpful). Who knew you could become a body shop pro?
- General Helpers: Isopropyl alcohol (for cleaning/prep), magic eraser (use EXTREME caution!), heat gun/hair dryer (for minor dent popping only if you know how). Grab these if you have them.
DIY Scratch Removal: Level 1 – Surface Scratches & Scuffs
Feeling under the weather about those fine marks? Don’t sweat it! Surface scratches are the easiest wins, often just marring the protective UV layer or clear coat. Let’s bounce these pests:
- First things first: don’t make those scratches worse! You’ve gotta start with a spotless surface. Grab some gentle car wash soap – not dish soap or harsh cleaners – and mix it with water in a bucket. Gently suds up the entire box, paying super close attention to that scratched spot. Why? Because any loose dirt or grit left behind will act like sandpaper when you start buffing, creating even more scratches. How frustrating would that be? After washing, rinse it off thoroughly – no soapy residue allowed. Then, dry every inch completely using clean microfiber cloths. Seriously, skip the old bath towels; they can leave lint or even tiny scratches themselves. Rubbing dirt into the plastic while trying to fix it? No way, that totally sucks! Taking these few extra minutes prevents a world of hurt later.
- Okay, brace yourself because this sounds nuts: regular toothpaste can fix minor scratches. For real? Yep, the plain white, non-gel, non-whitening kind you probably have in your bathroom. Why does this work? It contains super fine abrasives, perfect for polishing out light surface marks. Squeeze out just a pea-sized blob onto a section of your damp microfiber cloth. Pressing with medium pressure, rub it directly over the scratch using small, tight circles, overlapping your strokes. Keep at it for a solid 30 to 60 seconds – you need enough time for those abrasives to work their magic. Wipe off the haze with a different, clean, damp part of your cloth and check your progress. If it’s looking better but not quite gone, nice try, go ahead and repeat. But here’s the catch: Don’t go wild scrubbing like you’re cleaning tile grout! It is abrasive, and overdoing it can wear down the plastic. This hack is legit awesome for small, annoying surface scuffs you just want gone. Wondering about proper washing techniques long-term? Our guide on how to carwash with a car roof box covers safe methods to avoid creating more scratches.
- Plastic Polish Power: This is the more reliable method. Apply a small amount of plastic polish (like Meguiar’s PlastX) to a clean, dry microfiber applicator pad or cloth. Work it into the scratched area using those same small, overlapping circles. Apply moderate pressure. You’ll see the polish turn hazy as it dries. Buff it off vigorously with a clean, dry microfiber cloth until it shines. That’s awesome how it brings back the clarity! Often takes multiple applications.
- Wax On, Protection On: After polishing, protect your work! Apply a quality automotive spray wax according to the directions. This adds a protective layer and enhances the shine. Fair enough, easy peasy maintenance step.
- The Magic Eraser Caution: Are you kidding me? These things are abrasive! They can work on stubborn scuffs but use them wet and very gently, only as a last resort on surface marks. Test in an inconspicuous spot first! Overuse will dull the plastic. My bad if I sound like a broken record, but it’s important!
DIY Scratch Removal: Level 2 – Light Scratches (Into the Color)
So your fingernail catches a bit? Bummer. But it’s not a big deal with the right approach. We’re stepping up the game slightly:
- Deep Clean & Mask: Repeat the thorough wash and dry. If the scratch is near an edge or decal, use masking tape to protect surrounding areas. Hang tight, prep is key!
- Plastic Scratch Remover Kit: These kits (like 3M Scratch Remover) usually include a compound and a polish/finisher. Follow the kit instructions precisely! Typically, you apply the compound with an applicator pad using moderate pressure in small circles over the scratch. Wipe off the residue, then apply the finishing polish to restore shine. Works wonders on many light scratches.
- The Gentle Rubbing Compound Route: If you don’t have a kit, a very fine automotive rubbing compound can work. Apply a tiny dab to a damp microfiber applicator pad. Work in small circles over the scratch with light to medium pressure. Wipe off frequently to check progress! Stop immediately if you see color coming off on the cloth – that means you’re going too deep. Follow immediately with plastic polish and then wax. I’m down with this method, but caution is king.
- Wet Sanding (The Light Touch): For slightly deeper light scratches or small areas, ultra-fine wet sanding might be needed. This sounds intense, but it’s manageable. Use 2000-grit or finer wet/dry sandpaper. Keep it soaking wet! Dip the paper in water frequently. Sand only over the scratch itself, using very light pressure, feathering out the edges. Sand for just a few seconds, wipe clean, and inspect. Stop before you hit the base plastic! Immediately follow with plastic polish (aggressively) to remove the sanding haze, then polish again, then wax. Phew! It takes patience.
DIY Scratch Removal: Level 3 – Deep Scratches & Gouges
Oh snap! Deep gouge staring back at you? That’s lit… but not in a good way. This is advanced territory, requiring filling and painting. It’s a long shot for perfection without pro tools, but you can make it look much better. You good to tackle it?
- Clean & Prep Like a Pro: Wash, rinse, dry. Clean the gouge itself thoroughly with isopropyl alcohol to remove any wax or grease. Let it dry. Mask off a generous area around the scratch – you’ll be sanding and painting.
- Filling the Void: Mix your plastic repair filler (like Permatex Plastic Repair) according to the instructions. Usually, it’s a two-part epoxy you knead together. Apply it carefully into the gouge using an applicator stick or putty knife, slightly overfilling it. Smooth it as best you can. Let it cure completely – don’t rush this! Follow the cure time on the package religiously. Wondering how long this whole process takes? Check out our guide on how long it takes to fit a car roof box for context on roof box time investments!
- Alright, buckle up because this is where the real elbow grease kicks in for fixing those deep gouges. Once that plastic filler is absolutely rock solid – seriously, don’t rush this curing time or you’ll wreck it – grab your wet/dry sandpaper and a bucket of water. You’ll start with the coarsest grit, around 800, always keeping the paper and the surface soaking wet as you work. Gently sand over the repaired spot, focusing on knocking down any proud filler blobs until it’s perfectly flush with the original plastic around it – how satisfying is that when it finally levels out? Don’t stop there, though! The magic for a truly invisible fix happens next: you must progressively move to finer and finer grits. Think 1000, then 1500, then 2000, maybe even going up to 3000 for that final glassy smoothness. Remember to sand in one consistent direction with each grit (say, left to right), then switch direction (up and down) when you move to the next finer one – this helps erase the scratches from the previous, coarser paper. Keep dipping the paper constantly and rinsing the area, wiping it clean and dry with a microfiber cloth frequently to check your progress under good light. How meticulous do you need to be? Extremely! This tedious arm workout is absolutely critical to avoid seeing or feeling any ridge between the old plastic and your repair later. It totally sucks while you’re doing it, feeling like a never-ending chore, but stick with it – seeing that repair spot turn smooth and seamless is worth the grunt work, seriously. This step makes or breaks the whole fix, so patience is your best friend here. Wondering how long this kind of project might tie up your weekend? Our guide on how long to fit a car roof box gives context for roof box time investments, and repairs add to that!
- Primer Time: Clean the entire sanded area again with isopropyl alcohol. Apply thin, even coats of plastic adhesion promoter/primer. Hold the can the recommended distance (usually 8-12 inches). Let each coat flash off according to the can. Usually 2-3 light coats are better than one thick one. Let the final primer coat cure fully. Feeling under the weather yet? We’re getting there!
- Color Match Magic: This is crucial! Find the exact color code for your roof box (often inside the lid or on a manufacturer label). Get color-matched spray paint designed for plastic automotive parts. Apply in thin, even coats, again holding the correct distance. Let each coat flash off. Build up the color slowly – how many times have people ruined a job with one thick, drippy coat? Too many! Usually 2-4 coats are needed for full coverage. Allow proper drying time between coats. Choosing the right box color initially matters too – our how to choose a car roof box guide covers aesthetics!
- Sealing the Deal with Clear Coat: Once the color coat is fully dry (check the paint can!), apply 2-3 thin, even coats of clear coat spray paint. This protects the color and adds gloss. Let this cure completely – several days, ideally, before handling or exposing it to weather. Patience is your best friend now.
- Final Polish & Blend: Alright, so your clear coat is finally rock solid – nice try, thinking you were done! How annoying is that? Take a super close look. You might spot a slight roughness difference where you sprayed, or maybe a faint ridge where the new clear meets the old stuff. No big deal, but you gotta blend that out for that factory-smooth finish. Grab some super fine polishing compound – something like Meguiar’s Ultimate Compound works legit well. Dab a bit onto a clean foam applicator pad. Now, work it over the repaired spot using firm pressure and small circles, but crucially, feather it out well beyond the edges into the surrounding original clear coat. Why? This gently cuts and buffs everything level, making that repair zone completely disappear into the good plastic. How satisfying is that? Once it looks uniform and glossy, wipe off any residue. But hold up! Don’t skip the final finesse. Go over the whole repaired section with a dedicated plastic polish on a fresh pad to amp up that deep, clear shine and remove any tiny hazing left by the compound. Finally, lock in all your hard work and shield it from the sun and grime by applying a good coat of automotive spray wax. Yeah, it’s a lot of steps – cleaning, filling, sanding, painting, then polishing and waxing – and your arm might be feeling it. But for real? Seeing that nasty gouge vanish and your box looking sharp again after all that grunt work is incredibly satisfying and totally worth it. Protecting that finish long-term is key, which is why picking durable materials matters from the start – our guide on how to choose a car roof box covers that!
Prevention is the Best Medicine: Keeping Your Box Scratch-Free
How’s it going after all that hard work? Pretty good, I hope! Now, let’s make sure you don’t have to do this again anytime soon. Totally easier to prevent scratches than fix them:
- Loading/Unloading Smarts: Be mindful! Lift items clear of the box edges. Pad sharp edges on gear (skis, snowboards, bike pedals) with towels or foam before loading. Don’t drag items in or out. Dude, a little care goes a long way. Packing strategically helps – learn how to pack a car roof box efficiently and safely.
- Invest in a Protective Mat: Placing a rubber or foam mat inside the bottom of the box protects the interior floor from scrapes by your gear. Legit simple protection.
- Parking Paranoia: How many times have you squeezed into a tight spot? Try to park away from other cars and shopping cart corrals. Avoid low-hanging branches! Come on, we’ve all been there, but a few extra steps walking saves the box.
- Cleaning Correctly: Listen up, because this cleaning advice is make-or-break for your box’s looks. Seriously, ditch the stiff-bristled brushes, harsh kitchen cleaners with bleach or ammonia, and absolutely skip those automatic car wash rollers – they’re brutal! For real, how frustrating would it be to create new scratches just trying to clean off the dirt? Stick with the gentle stuff: mix a mild car wash soap (the kind meant for your vehicle’s paint) with plain water. Grab a super soft microfiber mitt or a bundle of plush microfiber cloths – they’re your best friends here. If you really want a dedicated cleaner, make sure it’s specifically formulated for plastics. Totally confused about the safest way to wash it? Our detailed guide on how to carwash with a car roof box has your back. And here’s a huge one: if you’ve driven on winter roads treated with salt or de-icer, you must rinse that box down extra thoroughly as soon as you can. Why? That salt isn’t just ugly; it can cause nasty stains and even damage the plastic if it sits. Finally, never let it air dry! Grab those microfiber towels again and dry every inch completely. How annoying are water spots? They bake on in the sun and look terrible, plus letting water sit invites mineral deposits. This whole gentle cleaning and drying routine? It’s absolutely non-negotiable if you want your gear hauler to stay looking sharp and last for countless adventures. Nice try, rough world, but your roof box deserves better care!
- Regular Waxing: Applying a good quality automotive spray wax every few months adds a sacrificial layer that helps repel dirt and makes minor scratches less likely to form. It also helps protect against UV fading. Easy win!
- Consider a Protective Cover: If storing the box off-season or for long periods, use a fitted protective cover. This shields it from dust, UV rays, and accidental bumps in the garage. Find the best way in our guide on how to store your car roof box. Old school protection, but effective.
- Drive Aware: Be mindful of low clearances (garage doors!) and road debris. Giving trucks extra space reduces the rock chips! Remember, a damaged box can also affect your ride – see how cargo boxes affect gas mileage.
When Repair Isn’t Enough: Knowing When to Replace
Alright, let’s get real for a sec – sometimes, no matter how much elbow grease or hope you throw at it, that roof box is just too far gone. It totally sucks, especially after you’ve poured effort into fixing it, but it is what it is. How do you know when it’s truly time to wave the white flag and start shopping? Let’s break down the deal-breakers.
First off: if it’s structurally compromised, that’s your biggest red flag. We’re talking major cracks, especially near the spots where it bolts onto your roof racks – that’s a hard no for safety. Actual holes punched through the shell? Sections warped or crushed out of shape so the lid doesn’t seal right anymore? No way should you trust that on the highway. For real? Water pouring in during a storm doesn’t just soak your camping gear; it ruins the box’s interior foam and weakens it further. It’s not just ugly; it’s unsafe and will wreck your stuff. Don’t gamble with it.
Next up: sheer cosmetic overwhelm. Maybe it’s covered end-to-end in deep gouges, scrapes, and faded patches after years of hard use. How many weekends are you willing to sacrifice sanding, filling, and painting? Off the top of my head, the cost of all those repair supplies plus your valuable time might actually get you close to the price of a decent used replacement or a solid chunk towards a new one. Is that mountain of effort truly worth it? Totally makes sense to weigh your options – our guide on renting or buying a cargo box can help you crunch the numbers without the headache. Sometimes a fresh start is cheaper and way less grunt work.

Finally, consider the box’s overall story. Did a previous DIY fix start cracking, peeling, or just looking like a crusty mess? Nice try, but that’s often a sign the damage underneath was too severe, or maybe the repair method wasn’t quite right. How frustrating is that? Plus, if the box itself is ancient, feels brittle, has lost most of its color from sun damage, and has multiple issues, pouring more resources into it is probably throwing good money after bad. Your gear deserves better than a worn-out shell! If it’s time for an upgrade, figuring out the perfect fit is key – our cargo box size guide helps you nail it. Recognizing when it’s beyond saving saves you time, cash, and a whole lot of stress.
Got Questions? We’ve Got Answers!
What’s up with lingering doubts? No worries, let’s tackle some common head-scratchers:
Can I use car scratch remover on my plastic roof box?
Fair enough question! Some very mild car scratch removers designed for clear coat might work on surface scratches, similar to plastic polish. However, absolutely avoid heavy rubbing compounds or polishes meant for car paint unless they specifically state they are safe for plastic. They can be too abrasive and dull or damage the plastic surface. Stick to products formulated for plastic or headlight restoration for safety. Better safe than sorry!
Will repairing scratches make my roof box leak?
How’s it going with the worry meter? I’m really grateful you asked this! Properly repairing surface or light scratches shouldn’t affect the seal at all. However, deep scratch repairs involving filler and sanding near the seal or lid edge require extra caution:
- Mask off the gasket/seal area meticulously before sanding or painting. Getting filler residue or paint on the gasket can compromise its seal.
- Avoid sanding into the gasket material itself.
- Ensure filler and paint are fully cured and smooth near the seal so they don’t prevent the lid from closing flush.
If the scratch itself has actually punctured the box or damaged the sealing surface, a repair might not restore waterproofing. Inspect carefully! Preventing leaks is key.
How often should I wax my roof cargo box?
Totally depends on use and weather! A good rule of thumb is to apply a quality automotive spray wax every 3-4 months. If you use the box frequently, drive in harsh conditions (lots of sun, salt, sand, bugs), or just washed it after a particularly dirty trip, waxing it right after is a great habit. Think of it as sunscreen and armor for your box! That’s for sure an easy way to prolong its life and looks. Regular maintenance is legit.
Conclusion: Your Pristine Roof Box Awaits!
Man, it’s been ages since that roof box gleamed like it did fresh out of the shop, hasn’t it? Seeing those scratches every time you load up can really dampen the adventure vibe. But for real? If you’re determined to banish those eyesores, you absolutely have the power to do it! Whether you’re tackling a quick five-minute toothpaste buff on a light scuff (a surprisingly simple trick!) or diving deep into a weekend warrior project fixing a gnarly gouge, bringing your gear hauler back to life is totally within your reach. Remember the game plan: start by playing detective and figuring out exactly what kind of scratch you’re facing, then grab the right tools for that specific job level – no need for overkill or wasting cash. Cleaning meticulously isn’t just a suggestion; it’s your secret weapon against making things worse. Work step-by-step, stay patient, and don’t rush the cure times – how many repairs get ruined by impatience?
Too many! And hey, once it’s looking sharp again, embrace prevention like your new best friend. Careful loading, parking a bit further out to avoid dings, using only gentle washing methods (our guide on how to carwash with a car roof box is gold), and slapping on wax every few months saves you a mountain of future repair headaches. Why does even the best box get beat up? The road’s rough, gear happens, and life throws curveballs – it is what it is. But now? You’re loaded with the know-how to fight back and win. So grab those microfiber cloths, pick your fix (toothpaste magic, polishing power, or paint perfection!), and show those scratches who’s boss. Imagine cruising down the highway with a box that looks awesome again – how good would that feel? Stick with it through the arm workout, it’s seriously rewarding. Catch you out there with that restored shine! Feeling overwhelmed mid-fix? No worries, this guide’s got your back anytime.
Our team is creating outdoor-gear relevant articles with passion. If our articles can help you to find the correct solutions for your questions, we will be happy about that. In the content creation process, we usually collect accurate and useful information online or offline to compile our content in an organized way. Consequently, we can guarantee that you can discover some expected answers to your questions. We appreciate your time on our site.